Sunday 29 May 2011

Subtractional Cutting

You may have seen by now I have completed a few independent projects that involve different types of pattern cutting.  The first was making a hoody by taking the patterns from a previously manufactured hoody, the second and the third were from the Japanese pattern cutting books, the newest project has looked at using subtractional cutting.

Subtractional cutting is where you cut into what is effectively a tube of fabric, it is described as looking at the garment from a birds eye or Gods eye view.  What I find really interesting about this pattern cutting method is you never know what the outcome is going to be, it could go how you want it to, it could go completely wrong or it could be better than you thought.  But no two pieces will be the same.

This is how mine turned out.


The garments created using this method are like pieces of art work and I think that the randomness of this technique makes the process so interesting and exciting.

What do you think?

Thursday 26 May 2011

Finishing the first side of my Pin-Tucks

A you may have seen in the previous post that I made I had finally managed to insert the pin-tucks onto the side panel after solving the problems that I had.  The next step was to finish inserting the pleats and sewing them in, so that is what I have done today.

After completing the pin-tucks at the bottom of the panel I was final ready to start sewing each one down.  I had to sew a line of stitching underneath each pin-tuck to attach the fabric to thease so that they wouldn't move when the dress is being worn.


 When these had all been done the next step was to secure them to the base fabric at the edges this is so I can remove the pins and know that they will stay secure until I attach all the dress panels together.

 Once I had done this I had to cut away the extra fabric that was hanging over the base and overlock all the edges to stop freying.


The next step is to repeat the whole process on the other side.

Wednesday 25 May 2011

Continuing with my Pin-Tucks on my Final Garment

After overcoming the problem with the pin-tucks that I told you about in my previous post I could continue to pin-tuck the rest of the panel.  I carried on inserting the pin-tucks until I came across another problem the panel didn't fit!

 When I realized that It wasn't fitting at the bottom I decided to start to insert the pin-tucks from the top, it still wouldn't fit.  I knew that it must have been to do with the size and angle that I had inserted each pin-tuck in so I needed to solve this.


 To solve the problem I spoke with two of the fashion tutors at the college and we decided that it should solve the problem if I notched the side of the fabric at the fold lines to work as guidance when folding the fabric.

Thankfully this worked and my pin-tucks were fitting to the panel underneath.   As you can see below the pin-tucks fit nicely to the curves of the body which is how I wanted them to be.


Now I need to finish of inserting the pin-tucks and start the other side.

Tuesday 24 May 2011

Jimmy Choo sold for about £500 million

I'm sure that you have all heard of the internationally famous shoe brand Jimmy Choo.  Well it has recently been sold to Labelux an Austrian luxury group for about £500 Million.

Personally I don't think that this will make much difference to the status and brand identity that Jimmy Choo has; What do you think?

Starting to make my Main Dress

Now that my collar piece is finished and I have received the fabric that I ordered from London I can start to manufacture my dress.  The first thing that I needed to do was to was cut out the patterns for the pin-tucks in the fabric that I have received from London.

When trying to fit my patterns onto the fabric the biggest pattern wouldn't fit.
To solve this problem I had to cut the biggest pattern in half and add seam allowance to the two new edges.
 Now that I had been able to fit the pin-tuck patterns on the fabric, I could concentrate on sewing together the panels that will be behind the pin-tucks.  I can used a closed seam on this part as there is no way that I will be able to alter this seam if the dress doesn't fit.

 After sewing the two base panels together I could begin to think about the pin-tucks.  The first thing that I had to do was sew the three parts of the pin-tuck panel together to create a continuous strip.  When this was done I started to insert the fabric using the fold-lines on the pattern.
 On problem that I have come across when inserting the pin-tucks is that the fabric goes off to one side and starts to show the fabric underneath, to solve this problem I tried to manipulate the pleats to make the fabric travel back the other way but when sewing it moved back across creating the gap where the base fabric is showing.

To solve this problem I am going to trying sewing them in by putting the fabric through the machine the opposite way.

Finished Collar Piece on the Mannequin


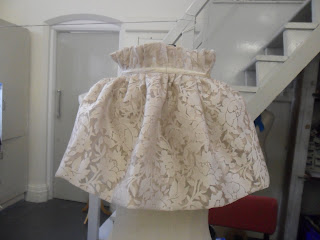
As promised here are the pictures of my finished collar piece on the mannequin.  I am pleased with the effect that is created and the fabrics that I have used but I wanted it too be tighter around the top to give more of a contrast between the tighter neck detail and the volume that is created, so when I fit it to my model I will make a decision as to whether I will tighten it or leave it looser.

What do you think?

Monday 23 May 2011

Finishing my Collar Piece/Cape

As you may have seen in my previous post I have inserted the pleats into my collar piece and now the next step is to create and attach the fastening which will also secure the pleats.  I could either choose between the fabric that I had used for the rest of the collar piece or the fabric which I have used for the main body of the dress.

 After looking at the effect of both these options I decided on using the fabric that I have used for the main body of the dress as I like the effect that is created by the addition of this fabric and the link that it creates between the collar piece and the dress.

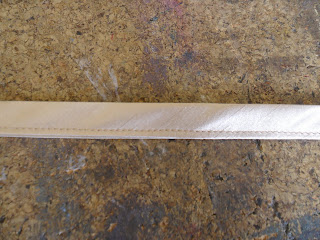
After deciding on this fabric I had to create the bias binding strip that would be used to hold the pleats in place and fasten the collar piece at the front.  One problem that I came across when sewing the bias binding strip was that I was finding it hard to sew close to the edge (shown below).
 After unpicking the previous line I tried again and managed to get closer to the edge and create the piece that I wanted.
 Now that the piece was final finished I could attach it to the pleated collar piece which went successfully and held the pleats in place.

The collar piece is now finished and I can focus on my main dress.  I will post a picture of this on the mannequin soon, what do you think?

Sunday 22 May 2011

Pleating my Collar Piece

You may have seen in my previous post during the previous stage of creating my collar piece I experienced a few problems; after I corrected these problems by re-sewing the seams that and making sure that both sides of my cape are the same length I am ready to re insert my pleats along the top edge.


The next step will be to create an attach a bias binding strip which will create the fastening.